I stumbled across this very interesting post and comment on Chingoni, Chilhomwe, Chisena and many more.
Category: africa
-
How to Resize Photos
My family’s email account in Blantyre was blocked twice in the past week, due to well-meaning but over-sized Christmas and New Year email greetings. Attachments with over 2 MBs. The family is still on a phone line with a very slow connection rate. And downloading emails with a large attachment takes forever and a day. Luckily I can access their account via the web and move the large emails out of the way. But I thought I’d raise some awareness.
And point you to some resources describing how to resize photos.
Using MS PaintHow to resize your photograph by exact dimensions
- Right click on the image and select ‘Edit’. (This should bring up Windows Paint).
- On the menu bar at the top, select Image -> Attributes…
- If the image is a portrait layout, use a width of 640 and a height of 480. If it’s a landscape layout, use a width of 480 and a height of 640.
- Save the file. (You may want to ‘Save As’ to a different file so you don’t overwrite the original).
How to resize your photograph by percent
- Right click on the image and select ‘Edit’. (This should bring up Windows Paint).
- On the menu bar at the top, select Image -> Stretch/Skew…
- Change the percentages in the Stretch box for both Vertical and Horizontal. Make them both the same or else the picture will not be proportionate.
- Save the file (you may want to ‘Save As’ to a different file so you don’t overwrite the original).
Using Picasa
Resize by exporting
Exporting lets you resize your photos while controlling the JPEG compression (image quality) introduced by your applied photo edits. The result is newly resized copies of your photos, saved to any location on your hard drive. During the export process, you can adjust both the ‘Image Size Options’ and the ‘Image Quality’ settings in the ‘Export to Folder’ screen.
- Under ‘Image Size Options,’ select the ‘Resize to’ option and adjust the size slider. The number of pixels you select with this slider determines the length or height of your photo (whichever is longer). The other dimension is determined automatically to maintain the aspect ratio of the photo.
- Select the desired image quality for your photo using the ‘Image Quality’ drop-down menu:
- Automatic: Preserves the original image quality
- Normal: Balances quality and size
- Maximum: Preserves fine detail for large file sizes
- Minimum: Yields some quality loss for small file sizes
- Custom: Enables you to select your own value
Resize by emailing
If you’re sending photos by email, you may want to resize then in order to get under the attachment size limitation. To change the size of the photos you email from Picasa, please follow these steps:
- Click the Tools menu.
- Select Options.
- Click the Email tab.
- Under ‘Output Options,’ use the slider to set your desired pixel size when emailing multiple photos. Use the radio buttons to set the desired pixel size for emailing single photos.
- Click OK.
Lazy workaround via Flickr
I sometimes use Flickr as a lazy workaround.
- Upload or email photo to the Flickr stream.
- Go to the photo page and select All Sizes.
- Select Small or Medium and click Download the Small (or Medium) Size.
File format:
Always use JPEG.There are tonnes of other ways to resize photos with free software, such as IrfanView or The Gimp.
Within MS Word:
Don’t change the viewable size within Word (e.g. dragging the corners of the photo). Word will store the image in its original size. Resize the photo before inserting it into Word.Adobe PDF:
Check the conversion settings.Check the sizes of all files (Word, pdf, .jpeg) before sending them.
Be considerate and don’t send photos in their original size. Especially if you don’t know what type of connection the recipient is using.
It’s five minutes for you versus 30 minutes of expensive download time on a plain old telephone connection for them.
-
Text Snippets Circling Around
Pêle-mêle off the top of my head:
Learnt yesterday:
The number of English-speaking Internet users is decreasing, currently at about 35% of total number of Internet users.Shared yesterday:
Who writes about African technology developments? From the list, I follow White African, Afrigadget, and sometimes Google Alert points me to IT News Africa.Photo processing software for Ubuntu:
I’m currently MacBook-less (there are plans to change this very soon), but in the meantime I’ve installed Ubuntu 8.04 on an Acer Aspire 5920. I tried upgrading to Intrepid Ibex, but I couldn’t get my LAN connection to work. Something to do with the MTU count. And I encountered 2 bugs during the install:- package update-manager 1:0.93.32 failed to install/upgrade: ErrorMessage: SystemError in cache.commit(): E:Sub-process /usr/bin/dpkg returned an error code (1), E:Sub-process /usr/bin/dpkg returned an error code (1)
- package ubuntustudio-menu 0.9 failed to install/upgrade: there is no script in the new version
So I went back to Hardy Heron. Cost: most of my Saturday. Learning effect: priceless.
I’ve been scanning the Internet for Linux photo processing software, besides Gimp, Picasa and F-Spot. ‘Cos so far Canon’s DPP has not been ported to Linux. I guess I could use it via Wine. But between you and me, I’m just looking for a good excuse to get a new MacBook. Beyond that DPP (still) lacks a good straightening tool.
I tried BlueMarine ‘cos it sounded promising, but I quickly gave up. Not usable.
There are a couple of commercial tools to consider:
- LightZone Linux
- Bibble
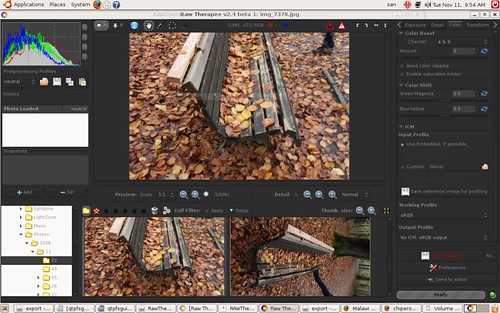
In the end I tried Raw Therapee and downloaded Qtpfsgui for HDRs. Both of which are free and look promising at this stage.
BTW, this blog post is good example how I can trick myself into writing a longer text. Initially, I just wanted to write a few Tweet-like text snippets, a summary of various small items circling around in my head. Pêle-mêle off the top of my head.
Please feel free to comment. I would be very grateful for any Ubuntu tips and tricks, etc.